Let's make the following tree made from the four panels by TATARA 7.0. 
The structure of this tree is as follows.
The stitching type is Sphere. 4 panels are perpendicularly located in a line as follows. 
The panel perpendicularly located in a line is piled up. 
The portion which the panel and the panel connect is hidden. 
And four panels is put on one sheet completely. 
All the panels are maximized and rotate every 45 degrees. You will look at a wooden texture, even if you see from which horizontal direction.
Let's make a form with this structure. And even if it is seen from a distance, let's keep a form from changing.
Let's make a tree from the following steps.
1) Transform a initial pillar into a panel by TOKOROTEN mode.
2) Make the top panel by ROKURO mode.
3) Copy the 1st panel to the three remaining sheets by Bitmap mode.
4) Choose the 2nd panel by Bitmap mode and rotate it by TSUCHI mode.
5) Choose the 3rd panel by Bitmap mode and rotate it by TSUCHI mode.
6) Choose the bottom panel by Bitmap mode and rotate it by TSUCHI mode.
7) Save the sculpted prim which you made.
8) Make the texture which the sculpted prim which you made uses.
9) Upload to the in-world.
If you master how to make this panel, you will be able to make simply the tree of 2 Prim who made the portion of the trunk by MAGE and made the portion of the leaf from this panel.
You can check this tutorial by following video.
Boot TATARA and choose New on the File menu. 
On the New dialog, set Sculpt Type as SPHERE and set Size as 16x64. 
Uncheck Disp Only Surface at the lower left of the edit pane. 
Set Grid on the View menu as 1. 
Set Edit Level in the lower left of an edit pane as Far so that you can edit easily. 
The circular gray control points and the black square control points are rearranged automatically.
Let's make the object as a panel.
Choose the TOKOROTEN tab. 
Change the section to edit, in order to edit only one section.
Click > button on the lower left of the edit pane, and set the section displayed to 41. 
As follows, choose all the control points currently displayed. 
Right-click the edit pane and choose Vertical Align of the popup menu. 
The selected control point is arranged as follows. 
The gray and black control points are rearranged automatically.
The preview is as follows. 
Let's make the first panel into the maximum size.
Choose the ROKURO tab. 
Click > button on the lower left of an edit pane, and set the section displayed to 40. 
As follows, rearrange the control point. 
As follows, rearrange the control point. 
As follows, rearrange the control point. 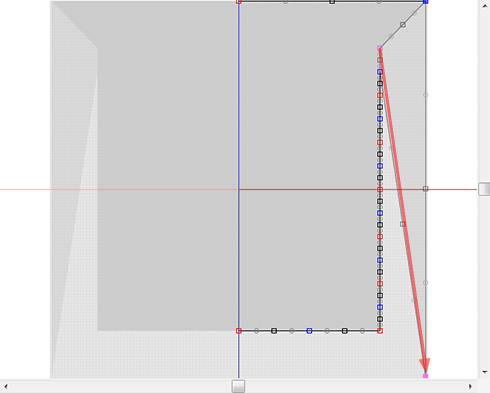
As follows, rearrange the control point. 
As follows, rearrange the control point. 
The first panel was made.
Let's copy this panel by Bitmap and make three panels.
Choose the Bitmap tab. 
Choose (00,00)-(G0,80) control points as follows. 
If you drag a mouse on the number of a control point, you can choose the range. If it chooses while you press the Shift key, the control point which the control point which is not chosen is added and is specified will be excepted.
Choose Copy on the Bitmap menu.
The shortcut of the keyboard is CTRL+C. 
As follows, choose control point (00,80). And choose Paste on the Bitmap menu. The shortcut of the keyboard is CTRL+V. 
Then, the coordinates of the control points were copied and the copied control points will be chosen.
As follows, choose (00,00) control point. 
Choose Paste on the Bitmap menu. The shortcut of the keyboard is CTRL+V. 
As follows, choose (00,80) control point. 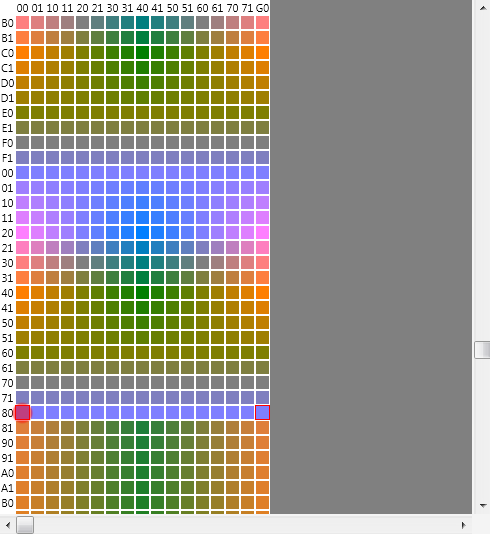
Choose Paste on the Bitmap menu. The shortcut of the keyboard is CTRL+V. 
Four panels have piled as follows. 
Let's rotate three panels.
Because four panels have overlapped completely, you can choose control points only by Bitmap tab.
Let's choose the control points by Bitmap tab and rotate them by the TSUCHI tab.
Let's change a setup, in order to rotate them simply.
Choose Setup on the File menu. 
Set Rotation Degree on the Setup dialog as 45. And click OK Button. 
Let's choose and rotate the 2nd panel.
As follows, choose (00,80)-(G0,F0) をcontrol points of the 2nd panel from the top, and choose the TSUCHI tab. 
As follows, click the XY button at the lower left of the edit pane. 
Right-click the edit pane and choose Rotate- of the popup menu. 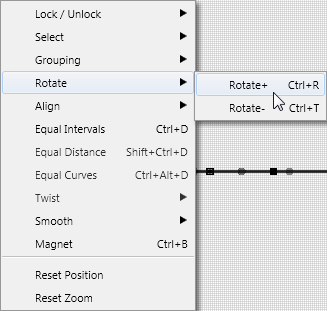
The selected panel from the top rotated 45 degrees.
Let's try another rotation method. Choose Setup on the File menu. 
Set the "Shift Rotate Deg." of the Setup dialog as 45 and click the OK button. 
When dragging the edge of the selected control points, and you press the SHIFT key, and rotating an object, the angle is divided every 45 degrees.
So, you can rotate an object correctly.
Click the Bitmap tab. 
As follows, choose (00,00)-(G0,71) control points of the 3rd panel from the top, and choose the TSUCHI tab. 
As follows, at the right end of the selected area, if rotational cursor is displayed, drag. And press the SHIFT key and rotate the selected panel 90 degrees. 
Let’s turn 4th panel.
Click the Bitmap tab.
As follows, choose (00,80)-(G0,F1) control points of the bottom panel, and choose the TSUCHI tab. 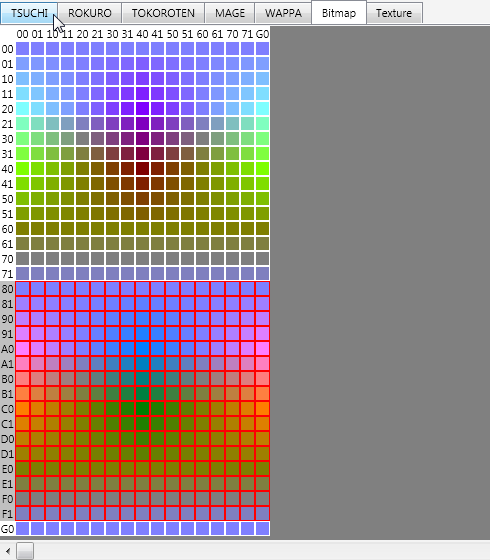
Right-click the edit pane and choose Rotate- of the popup menu. 
The 4th panel rotated 45 degrees counterclockwise.
The edit pane is displayed as follows. 
The preview is displayed as follows. 
If you change the setup of Level Of Detail on the View menu, you can check it. 
Let's save your sculpted prim.
Let's check Setup before saving.
Select Setup on the File menu. 
Set TGA Save Size as 64x64 in the displayed dialog.
And let's check the following items.
-Copy Protection by transparent When a Prim is modified, you can make it transparent to prevent the texture from being copied by screen capture.
-Auto Maximize The object saved when you save a sculpt map file is maximized automatically. 
If you check Auto Rename, overwrite of a sculpt-map file is prevented.
Let's save a sculpt-map file in TGA File format.
Select Save on the File menu. 
Select TGA File of Save Dialog and save the file. 
The sculpt map file of tree was completed.
Let's make the texture of 512x1024.
Make the following texture. The background is transparent. The size is 512x512. 
As follows, resize a texture to 512x1024. 
Add a transparent portion to the upper and lower sides of a texture.
Let's upload the sculpt-map file and texture to the in-world.
When you upload a sculpt-map file, be sure to choose Upload Image.
It costs 10L$ to upload one Sculpt-Map file.
Choose Upload - Image (L$10) on the Build menu. 
Check it by preview. Check Use lossless compression. 
Next, upload the texture. 
Let's apply the sculpt map to your prim.
Set Building Block Type of an object to Sculpted. 
And apply the sculpt map uploaded to it. 
Let's apply the texture to your prim.
Choose the texture tab, and apply the uploaded texture. 
set Horizontal scale to 2.0.
It is because a tree is displayed on the table and the reverse side of a panel, respectively. And set Vertical scale to 8.0. The tree texture is applied also to the joints of the panel, but you cannot see it. And set Horizontal offset to 0.5. 
If you set Alpha Mode as Alpha masking and set Mask cutoff as 50, the sculpted prim is displayed in the right order even if you check Advanced Lighting Mode of Graphic Preference. However, LI increases to 2.
You can specify Mask cutoff by 0 to 255. So please search the suitable value for your texture.
If you want to know about it more, please check secondlife wiki.
The tree was completed. 
Original text: http://kanaenet.blogspot.jp/2013/06/t704-1.html
This article is automatically translated by the computer interpreter.
Please notify me of any mistakes in translation.
Boot TATARA and choose New on the File menu. 
On the New dialog, set Sculpt Type as SPHERE and set Size as 16x64. 
Uncheck Disp Only Surface at the lower left of the edit pane. 
Set Grid on the View menu as 1. 
Set Edit Level in the lower left of an edit pane as Far so that you can edit easily. 
The circular gray control points and the black square control points are rearranged automatically.
Let's make the object as a panel.
Choose the TOKOROTEN tab. 
Change the section to edit, in order to edit only one section.
Click > button on the lower left of the edit pane, and set the section displayed to 41. 
As follows, choose all the control points currently displayed. 
Right-click the edit pane and choose Vertical Align of the popup menu. 
The selected control point is arranged as follows. 
The gray and black control points are rearranged automatically.
The preview is as follows. 
Let's make the first panel into the maximum size.
Choose the ROKURO tab. 
Click > button on the lower left of an edit pane, and set the section displayed to 40. 
As follows, rearrange the control point. 
As follows, rearrange the control point. 
As follows, rearrange the control point. 
As follows, rearrange the control point. 
As follows, rearrange the control point. 
The first panel was made.
Let's copy this panel by Bitmap and make three panels.
Choose the Bitmap tab. 
Choose (00,00)-(G0,80) control points as follows. 
If you drag a mouse on the number of a control point, you can choose the range. If it chooses while you press the Shift key, the control point which the control point which is not chosen is added and is specified will be excepted.
Choose Copy on the Bitmap menu.
The shortcut of the keyboard is CTRL+C. 
As follows, choose control point (00,80). And choose Paste on the Bitmap menu. The shortcut of the keyboard is CTRL+V. 
Then, the coordinates of the control points were copied and the copied control points will be chosen.
As follows, choose (00,00) control point. 
Choose Paste on the Bitmap menu. The shortcut of the keyboard is CTRL+V. 
As follows, choose (00,80) control point. 
Choose Paste on the Bitmap menu. The shortcut of the keyboard is CTRL+V. 
Four panels have piled as follows. 
Let's rotate three panels.
Because four panels have overlapped completely, you can choose control points only by Bitmap tab.
Let's choose the control points by Bitmap tab and rotate them by the TSUCHI tab.
Let's change a setup, in order to rotate them simply.
Choose Setup on the File menu. 
Set Rotation Degree on the Setup dialog as 45. And click OK Button. 
Let's choose and rotate the 2nd panel.
As follows, choose (00,80)-(G0,F0) をcontrol points of the 2nd panel from the top, and choose the TSUCHI tab. 
As follows, click the XY button at the lower left of the edit pane. 
Right-click the edit pane and choose Rotate- of the popup menu. 
The selected panel from the top rotated 45 degrees.
Let's try another rotation method. Choose Setup on the File menu. 
Set the "Shift Rotate Deg." of the Setup dialog as 45 and click the OK button. 
When dragging the edge of the selected control points, and you press the SHIFT key, and rotating an object, the angle is divided every 45 degrees.
So, you can rotate an object correctly.
Click the Bitmap tab. 
As follows, choose (00,00)-(G0,71) control points of the 3rd panel from the top, and choose the TSUCHI tab. 
As follows, at the right end of the selected area, if rotational cursor is displayed, drag. And press the SHIFT key and rotate the selected panel 90 degrees. 
Let’s turn 4th panel.
Click the Bitmap tab.
As follows, choose (00,80)-(G0,F1) control points of the bottom panel, and choose the TSUCHI tab. 
Right-click the edit pane and choose Rotate- of the popup menu. 
The 4th panel rotated 45 degrees counterclockwise.
The edit pane is displayed as follows. 
The preview is displayed as follows. 
If you change the setup of Level Of Detail on the View menu, you can check it. 
Let's save your sculpted prim.
Let's check Setup before saving.
Select Setup on the File menu. 
Set TGA Save Size as 64x64 in the displayed dialog.
And let's check the following items.
-Copy Protection by transparent When a Prim is modified, you can make it transparent to prevent the texture from being copied by screen capture.
-Auto Maximize The object saved when you save a sculpt map file is maximized automatically. 
If you check Auto Rename, overwrite of a sculpt-map file is prevented.
Let's save a sculpt-map file in TGA File format.
Select Save on the File menu. 
Select TGA File of Save Dialog and save the file. 
The sculpt map file of tree was completed.
Let's make the texture of 512x1024.
Make the following texture. The background is transparent. The size is 512x512. 
As follows, resize a texture to 512x1024. 
Add a transparent portion to the upper and lower sides of a texture.
Let's upload the sculpt-map file and texture to the in-world.
When you upload a sculpt-map file, be sure to choose Upload Image.
It costs 10L$ to upload one Sculpt-Map file.
Choose Upload - Image (L$10) on the Build menu. 
Check it by preview. Check Use lossless compression. 
Next, upload the texture. 
Let's apply the sculpt map to your prim.
Set Building Block Type of an object to Sculpted. 
And apply the sculpt map uploaded to it. 
Let's apply the texture to your prim.
Choose the texture tab, and apply the uploaded texture. 
set Horizontal scale to 2.0.
It is because a tree is displayed on the table and the reverse side of a panel, respectively. And set Vertical scale to 8.0. The tree texture is applied also to the joints of the panel, but you cannot see it. And set Horizontal offset to 0.5. 
If you set Alpha Mode as Alpha masking and set Mask cutoff as 50, the sculpted prim is displayed in the right order even if you check Advanced Lighting Mode of Graphic Preference. However, LI increases to 2.
You can specify Mask cutoff by 0 to 255. So please search the suitable value for your texture.
If you want to know about it more, please check secondlife wiki.
The tree was completed. 
Original text: http://kanaenet.blogspot.jp/2013/06/t704-1.html
This article is automatically translated by the computer interpreter.
Please notify me of any mistakes in translation.


