Let's make the following Cherry by TATARA 7.0 and SOMATO 3.0. 
About "TATARA part", you can make it on OSX by OSX version of TATARA 7.0. But you can’t make "SOMATO part" on OSX, because OSX version of SOMATO isn’t released now.
To make it, I prepared the image of the following cherry. 
TATARA resizes the read background image automatically.
So, if you make a background image, please remove the space.
Let's make the cherry from the following steps.
1) Choose 32x32 of SPHERE by New on the File menu.
2)Make a cherry on MAGE mode.
3)Choose Save on the File menu and save the object by OBJ file format.
4)Boot SOMATO and make the texture of the cherry from the OBJ file made by TATARA and from the background image.
5)Modify the texture with your graphic tool.
6)Load and check the texture made by SOMATO on TATARA.
7)Choose Save on the File menu, and maximize and save the sculpt map file.
8)Upload to in-world and modify it.
You can check this tutorial by following video.
Let's make the form of the cherry.
Boot TATARA and choose New on the File menu. 
On the New Dialog, choose 32x32 of SPHERE and click the OK button. 
Click a MAGE tab and change to MAGE mode. 
Choose Load Background on the View menu and display the following background image. 
To edit easily, set Edit Level on the lower part of the Edit pane as Middle. 
Let's make the stalk of the cherry.
Arrange the control points as follows. 
Arrange the control points as follows. These control points are the boundary lines of the stalk and the fruit. 
Arrange the control points as follows. These control points are the center of the stalk. 
Arrange the control points as follows. 
Let's arrange the control points of the stalk of the cherry at equal intervals.
Choose the control points shown in red area. 
If you select the control points pressing the Shift key, the already selected control points will be kept. But if you select already selected control points then, they will be canceled.
Right-click the editing pane and select Equal Distance of the pop up menu. 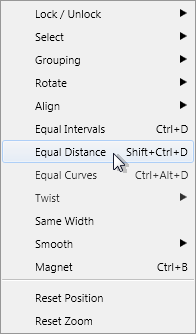
Then, the selected control points are rearranged mostly at equal intervals, maintaining the curve.
As follows, adjust the position of the round gray control points of yellow area. 
They were rearranged as follows. 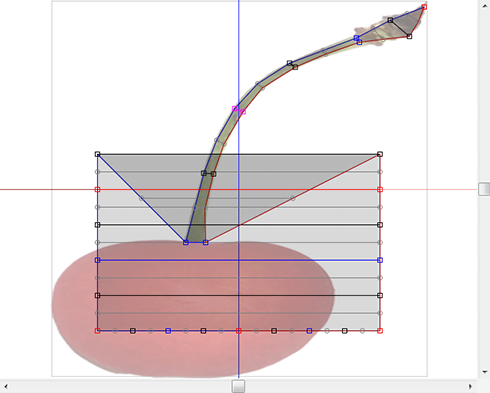
The stalk of the cherry was made. Let's make the fruit of the cherry.
As follows, rearrange the control points. Please don’t pile up them. 
Arrange the control points as follows. 
Check the preview pane whether the object is inside out.
If it is inside out, please replace the control point of a right-and-left pair. 
Arrange the control points as follows. 
Arrange the control points as follows. 
Arrange the control points as follows. 
Let's rearrange the control point of the fruit of a cherry at equal intervals.
Choose the control points shown in red area. 
Right-click the editing pane and select Equal Distance of the pop up menu. 
The control points selected as follows are rearranged. 
Please repeat this operation 2 to 3 times. They will be arranged well more appropriately.
Rearrange the round gray control points shown in yellow area so that the fruit of the cherry bears round. 
As follows, choose two control points of the lower end of a cherry. 
Rearrange the selected control points as follows and adjust the stalk of a cherry, and the knot of a fruit. 
Rearrange the round gray control points shown in yellow area. 
As follows, choose two control points of the lower end of the cherry. 
Right-click the editing pane and select Magnet of the pop up menu. 
The form of the cherry was completed as follows. 
Let's save the form of the cherry by OBJ so that it may be easy to process by SOMATO.
Save the file by Save on the File menu. 
Choose OBJ File (Mesh of Triangles). 
Boot SOMATO without ending TATARA. SOMATO is a tool which makes the texture of a sculpted prim using the background image of TATARA. 
You can’t use SOMATO on OSX, because OSX version of SOMATO isn’t released now.
Choose Open Object on the File menu, and load the saved OBJ file. 
As follows, click the upper right ZX button. 
Select Open of the Source menu and open the image used as the background image on TATARA. 
The window of SOMATO is displayed as follows. 
Let's adjust the position of the image to project.
You can drag the control points displayed at the edge of the texture, and can adjust the position where the texture is applied. 
You can also adjust them for the figure of a lower right text box. 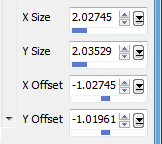
You can specify the size of the image outputted by Size on the Texture menu, and can specify the resolution of the object applied by Resolution on the Texture menu. 
Click the upper right X-ray radio button, and click the Bake button. 
As follows, you can check the texture made by the preview pane. 
If the texture which you expected is made, select Save on the Texture menu and save your texture. 
The following textures were made. Please modify the yellow area with the knot etc by your graphic tool. Since the stalk has caved in very much, because it is red, please modify the area green. Please do not add the alpha channel, when you save the texture with your graphic tool. 
And please resample your texture to suitable size (for example, 512x512).
Let's open the texture modified with the graphic tool on TATARA.
Load the texture saved by Load on the Texture menu. 
To check a texture, uncheck Disp Mesh on the View menu. 
The cherry is displayed on the preview pane as follows. 
Let's check Setup before saving.
Choose Setup on the File menu. 
Set TGA Save Size as 64x64 in the displayed dialog.
And let's check the following items.
-Copy Protection by transparent When a Prim is modified, you can make it transparent to prevent the texture from being copied by screen capture.
-Auto Maximize The object saved when you save a sculpt map file is maximized automatically. 
If you check Auto Rename, overwrite of a sculpt-map file is prevented.
Let's save the sculpt-map file by TGA File format.
Select Save on the File menu. 
Select TGA File of SaveDialog and save the file. 
Let's upload the sculpt-map file to the in-world.
When you upload a sculpt-map file, be sure to choose Upload Image.
It costs 10L$ to upload one Sculpt-Map file.
Select Upload - Image (L$10) on the Build menu. 
Select the texture file, and upload after checking by preview. 
Select Upload - Image (L$10) on the Build menu.
Specify “Preview image as” as Sculpted Prim.
And check it by the preview. Check Use lossless compression. 
Let's apply the uploaded sculpt map and texture to the prim.
Click the Object tab. And set Building Block Type to Sculpted. 
And apply the sculpt map uploaded to it. 
Click the Texture tab. And apply the texture uploaded to the texture of the Texture tab. 
Modify the form of the cherry as follows. 
The cherry was completed. 
Original text: http://kanaenet.blogspot.jp/2013/07/t706-1.html
This article is automatically translated by the computer interpreter.
Please notify me of any mistakes in translation.


