Let’s make a following saury. 
Let's make sculpted prim from TATARA 5.0 and make a texture from SOMATO 3.0.
Let's make a fish from the following steps.
1) Take the photo of the fish and remove the blank with graphic Tool.
2) Trace the contour of the fish in the MAGE mode of TATARA.
3) Make a caudal fin in the WAPPA mode of TATARA.
4) Make a ventral fin and a dorsal fin in the TSUCHI mode of TATARA, and save it as sculpted prim.
5) Load a photo of the fish and sculpt-map into SOMATO and make a texture.
6) Maximize sculpt-map by TATARA.
Let's make a fish.
Take the photo of a fish. And remove the blank of the photo as follows. 
Boot TATARA and select the MAGE tab.
Select Load BackGround on the View menu and load the photo of a fish. 
A background image is automatically resized by 1:1.
Select all the control points. 
Rotate 90 degrees counterclockwise.
Since it changes to rotational cursor when moving cursor near the corner, drag a mouse. 
Set Edit Level in the lower part of the editing pane to Middle. 
Arrange control points along with the contour of a fish as follows.
If you are kept from overflowing a background image in an object, you will tend to make the texture of that from SOMATO.
Please arrange so that the horizontal position of the control points of the upper bottom becomes an equal to generally. 
Arrange the control points of the square as follows. 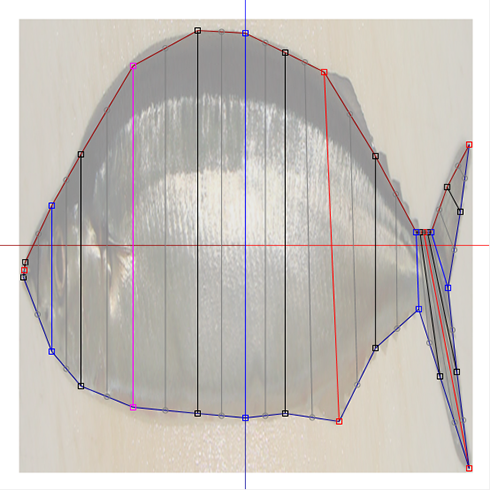
Edit Level in the lower part of an editing pane is set to Near. 
Set Edit Level in the lower part of the editing pane to Near. 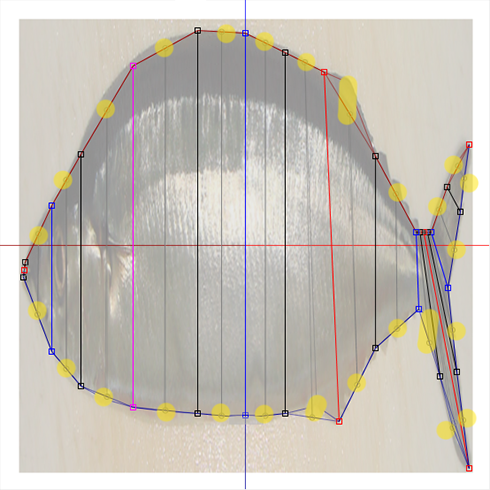
Please check arrangement of the control point of a caudal fin.
The preview is displayed as follows. 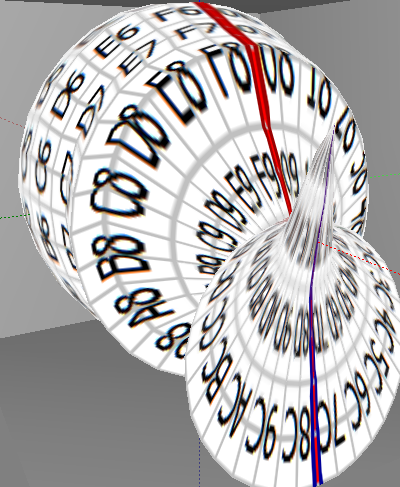
Let's make the caudal fin, and the ventral fin and the dorsal fin.
Let's edit the caudal fin. Select the WAPPA tab.

Select Select None on the Sides menu. 
Select a cross section with <> button at the lower left of an editing pane, click a central button and select the cross sections of 12 from A0 to F1.

Click < button several times, return to the cross section of A0, and select all the control points. 
Select Align>>Vertical Align on the Popup menu which right-clicks an editing pane and is displayed. 
The shortcut key of Vertical Align is Ctrl-E.
The caudal fin was completed now.

Let's prepare the ventral fin and the dorsal fin.
Select the TSUCHI tab.

Click the YZ button at the lower left of the editing pane.

Then, it is displayed as follows. You can see the cross section of the dorsal fin and the ventral fin be round.

Let's select the cross section to edit.
The cross sections related to the dorsal fin and the ventral fin are 80 and 81.
Select Edit Lines on the View menu.

Click the Reverse button, make all un-selecting, check 80 and 81 of Rows, and edit only this cross section.
And click the OK button.

Check the Disp Edit Lines check box in the lower part of the editing pane.

Then, you will see only the control point which can be edited displayed.
Since the object is symmetrical, rearrange right-hand side control points as follows.

Furthermore, rearrange control points as follows.

Uncheck the Disp Edit Line check box in the lower part of an edit display. 
Then, only the cross section for the editing is displayed.
Yellow area is the edited division.

The preview is displayed as follows. 
Let's copy right side to left side.
Select Mirror 80-GG from 00-7G on the Edit menu.

Since the field used as a mirror is a field which consisted of blue and red, click the ZX button selected by the default of the displayed dialog.

The right and left of the fish became symmetrical. 
Let's check Setup before saving.
Select Setup on the File menu.

Set TGA Save Size as 64x64 in the displayed dialog.
And let's check the following item.
-Copy Protection by transparent
Acquisition of sculpt-map file by the screen shot of a preview is prevented.
The overwrite of a file is prevented if you check Auto Rename.
And let's uncheck the following points.
-Auto Maximize
sculpted prim is maximized and saved. It is for making a texture from SOMATO simply.(Even if you check it, you can make a texture from SOMATO.)

Let's save sculpt-map file as TGA File format.
Select Save on the File menu.

Select TGA File of SaveDialog and save the file.

The sculpt-map for making a texture was completed.
Let's boot SOMATO, without ending TATARA.
Load into SOMATO the photo of sculpt-map file made by TATARA, and the fish used by TATARA, and make the texture of a fish.
Boot SOMATO. And select Load Object on the File menu and load the sculpt-map.

The form of the loaded sculpted prim is displayed on the right side of the screen. 
When you click the button of six XY/YZ/ZX in the upper right of an editing pane, the orientation on which an object is projected changes.
Let's load the photo of the fish. The image is managed for every orientation projected.If you click the ZX button of the following figures, the object which looked at the fish from the side will be displayed.

Load on the Source menu is selected and the photo of the fish is loaded.

The photo of the fish was displayed on the editing pane as follows. 
Since you are making the form from the photo of the same fish, arrangement of a source image is the same as the form of a sculpted prim. So, you do not need to tune finely for uniting a texture and a form. This is the merit which uses TATARA and SOMATO collectively. When you want to adjust the position of a source image, please drag the control point of a square. You can also use the text boxes at the lower right of the editing pane.
Select the texture size to make.
Although 512x512 and 1024x1024 can be uploaded as they are at a second life, it is necessary to resize 2048x2048 with graphic Tool.

Select Bake Type.
Sunrays projects a texture on the place where light has hit like a sunbeam. X-ray projects a texture to the back side like Roentgen rays.
Since a fish is a back-and-front equal-to texture, check X-ray.
And click the Bake button.

Then, the texture was completed. You can check it by preview.

Select Save on the Texture menu and save a texture. 
The completed texture is the following.

Let's load a texture into TATARA and maximize sculpt-map file.
Even if it maximizes sculpted prim, the position of a texture does not shift.
If you have closed TATARA, boot TATARA, select Load on the File menu, and load sculpt-map file of a fish.
Load on the Texture menu is selected and the texture of the fish is loaded. 
The texture to which mesh Information was added is displayed as follows.

If you select Disp Mesh on the Veiw menu, mesh Information on a texture is not displayed.

Select Maximize on the Edit menu and maximize sculpted prim.

You can see the object from which the texture has not shifted on the preview.

Let's save a sculpt-map file in TGA File format.
Select Save on the File menu.
Select TGA File of SaveDialog and save the file. 
Let's upload the sculpt-map file and texture file to the in-world.
When you upload a sculpt-map file, be sure to choose Upload Image.
It costs 10L$ to upload one Sculpt-Map file.
Choose Upload - Image (L$10) on the Build menu. 
Check it by preview. Check Use lossless compression. 
Let's apply uploaded sculpt-map to the prim.
Set Building Block Type of an object to Sculpted. And apply the sculpt map uploaded to it.

Adjust the scale of object.
And also upload the texture made by SOMATO.
Check by preview.

Apply the uploaded texture to the prim.

The fish was completed.


Original text: http://kanaenet.blogspot.com/2011/04/blog-post.html
This article is automatically translated by the computer interpreter.
Please notify me of any mistakes in translation.


