6/28/2010

Tutorial T507 Make a Plastic Planter

Let's make the following plastic planter

To make this, I prepared the background image of the following plastic planter.

 
The side of the plastic planter
 
The upper part of the plastic planter

Let's make a plastic planter from the following steps.
1) Choose 32x32 of SPHERE by New on the File menu. 
2) Make the form where I saw the plastic planter from the upper part in TOKOROTEN mode. 
3) Make the form where I saw the plastic planter from the side in ROKURO mode. 
4) Choose Save on the File menu, and maximize and save the sculpt map file.

TATARA resizes the read background image automatically.
So, if you make a background image, please remove the space.

Let's make an upside form for a plastic planter.

Choose New on the File menu.

In the dialog, choose 32x32 of SPHERE and click the OK button.

Choose a TOKTOTEN tab and change edit mode into TOKOROTEN.

Let's change the section to edit into 41.

Click > button at the lower left of the edit pane.

The edit section is shown by the orange line on the preview.

Choose Load Background on the View menu and display the following background image.
 

Choose Symmetry - 4 Mirror on the View menu.

To edit comfortably, set Edit Level in the lower part of an Edit pane as Middle.

As shown in the following figure, choose and arrange two control points.
Other three control points are rearranged automatically.

As shown in the following figure, choose and arrange two control points.

As shown in the following figure, choose and arrange the control point.

As shown in the following figure, rearrange two control points, and make the corner round.

The form where I saw the plastic planter from the top was made.

Let's make the form where I saw the plastic planter from the side.

Choose a ROKURO tab and change edit mode into ROKURO.

Choose Load Background on the View menu and display the following background image.
 

As shown in the following figure, rearrange three control points and make the bottom of the plastic planter.

Let's arrange equally the control point which constitutes the bottom of a plastic planter.
As shown in the following figure, choose five control points.

Choose Equal Intervals on the Edit menu.

As shown in the following figure, rearrange two control points.

As shown in the following figure, rearrange two control points.

As shown in the following figure, rearrange two control points.

As shown in the following figure, rearrange three control points.

As shown in the following figure, rearrange four control points.
This area is a loose curved surface.

Let's smooth this area.
As shown in the following figure, choose nine control points.

Choose Equal Distance on the Edit menu.

The preview becomes as it is shown in the following figure.

Because the plastic planter which you are making is slender, please check an image as shown in the following figures to drag Y slider under the preview .

The plastic planter was completed.

Let's save the sculpt map file and upload to the in-world.

Let's check Setup before saving.
Choose Setup on the File menu.

Set TGA Save Size as 64x64 in the displayed dialog.
And let's check the following items.
-Auto Maximize The object saved when you save a sculpt map file is maximized automatically.
-Copy Protection by transparent  When a Prim is modified, you can make it transparent to prevent the texture from being copied by screen capture.
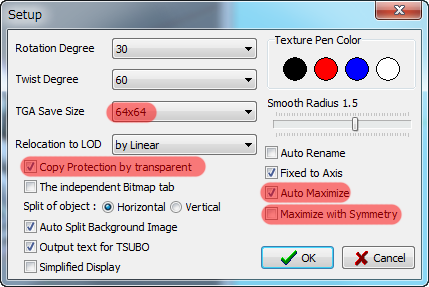
If you check Auto Rename, overwrite of a sculpt-map file is prevented.

Let's save a sculpt-map file in TGA File format.
Select Save on the File menu.

Select TGA File of SaveDialog and save a file.

Let's upload a sculpt-map file to the in-world.

When you upload a sculpt-map file, be sure to choose Upload Image.
It costs 10L$ to upload one Sculpt-Map file.

Choose My Inventory from a side menu.
 

Click + button displayed on the lower part, and choose Upload Image (L$10).

Check it by preview. Check Use lossless compression.

Set Building Block Type of an object to Sculpted.

And apply the sculpt map uploaded to it.

Stretch the object and change into the suitable form.

The plastic planter was completed.

Original text: http://kanaenet.blogspot.com/2010/06/blog-post_28.html
This article is automatically translated by the computer interpreter.
Please notify me of any mistakes in translation.

6/25/2010

Tutorial T504 Make a Baseball Helmet.

Let's make the following baseball helmet by TATARA 5.0.

To make this, I prepared the following background images of helmet.


The side of the helmet

The back of the helmet

Let's make a baseball helmet from the following steps.
1) Choose 32x32 of SPHERE by New on the File menu.
2) Make the helmet body (part of the hemisphere) of a helmet in ROKURO mode.
3) Make the nose of the eaves of a helmet.
4) Make the tip of the earmuffs of a helmet.
5) Choose Folder on the Sides menu.
6) Choose Save on the File menu, and maximize and save the sculpt map file.

TATARA resizes the read background image automatically. So, if you make a background image, please remove the space.

Choose New on the File menu.

In the dialog displayed, choose 32x32 of SPHERE and click the OK button.

To relieve that you edit, set Edit Level in the lower part of an Edit pane as Middle.

Choose Load Background on the View menu and display the following background image.

Choose two control points of the following figures and rearrange it. Please arrange the right-hand side control point in the position which overlaps with the silhouette at the left end of a helmet. It is left-hand side round red area.

As shown in the following figures, please arrange three control points. Arrange the rightmost control point on the helmet body of a helmet, and a salivary boundary.

Let's arrange the control points of a helmet body equally.
As shown in the following figures, choose the control point which constitutes the helmet body above eaves.

Choose Equal Distance on the Edit menu.

And arrange the control points of the gray circle smoothly.

As shown in the following figures, arrange the control point on the back side of the helmet body.

As shown in the following figures, arrange the control points of the gray circle.

As shown in the following figures, choose the left-behind control point.

Choose Equal Intervals on the Edit menu.

The selected control points were collected into yellow area.

Choose Magnet on the Edit menu without canceling selection.

The edge of the helmet was brought together in one point.
Arrange on the right the control point chosen so that it might overlap with the edge of a left-hand side helmet, as shown in the following figures.

Now, the helmet body was completed.

Let's make the eaves and earmuffs of a helmet.
Edit only the section currently displayed in ROKURO mode.
Choose Select None on the Sides menu.

The display of a preview changes as follows.

As shown in the following figures, draw out out the control point brought together in the edge of the helmet.
And arrange a red control point on the edge of the eaves shown in yellow area.


Let's arrange the control point on the front side of eaves equally.
As shown in the following figures, choose the control points on the front side of eaves.

Choose Equal Intervals on the Edit menu.

Let's arrange the control point on the back side of eaves equally.
As shown in the following figures, choose the control points on the back side of eaves.

Choose Equal Intervals on the Edit menu.

The control points of the section currently edited are arranged as shown in the following figures.

Let's make earmuffs.
Click < button, to set to 00 from 40 the number of the section which You are editing now in the lower left of an edit pane.

A preview is displayed as follows. As for the section displayed on an edit pane, an orange line is displayed.

Choose Load Backgroud on the View menu and display the background image of the back of the following helmet.
 

As shown in the following figures, arrange the control points which constitutes earmuffs.

The control points are arranged as shown in the following figures.

Two sections were edited. Let's make an edit result reflect in other sections by Folder on the Sides menu.
The Folder function should rearrange smoothly the control point where the section which is not chosen by the selected section is not locked.
As shown in the following figures, click < button in the lower right of an edit pane, and click and choose the section of 00, B0, 70, 40, and 10.

The preview is displayed as follows. It is the section as which yellow area was chosen.
You can check that they are expressed not as gray but as the selected color.

Choose Folder on the Sides menu.

The preview is displayed as shown in the following figures.

The baseball helmet was completed. Let's check Setup before saving.
Choose Setup on the File menu.

Set TGA Save Size as 64x64 in the displayed dialog.
And let's check the following items.
-Auto Maximize The object saved when you save a sculpt map file is maximized automatically.
-Copy Protection by transparent  When a Prim is modified, you can make it transparent to prevent the texture from being copied by screen capture.

If you check Auto Rename, overwrite of a sculpt-map file is prevented.

Let's save a sculpt-map file in TGA File format.
Select Save on the File menu.

Select TGA File of SaveDialog and save a file.

Let's upload a sculpt-map file to the in-world.

When you upload a sculpt-map file, be sure to choose Upload Image.
It costs 10L$ to upload one Sculpt-Map file.

Choose My Inventory from a side menu.

Click + button displayed on the lower part, and choose Upload Image (L$10).

Check it by preview. Check Use lossless compression.

Set Building Block Type of an object to Sculpted.
And apply the sculpt map uploaded to it.

Stretch the object and change into the suitable form.

The baseball helmet was completed on In-World.

Original text: http://kanaenet.blogspot.com/2010/06/blog-post.html
This article is automatically translated by the computer interpreter.
Please notify me of any mistakes in translation.