Let’s make the following handkerchief covered on the glass by TATARA 7.0 and Height Plug-in and UTSUSHI. Becasue UTSUSHI is only for Windows. So I prepared the image made by UTSUSHI for OSX users. 
Let's make the following handkerchief covered on the glass from the following steps.
1) Make the form of the glass hidden in the handkerchief using TATARA.
2) Save the created glass by the OBJ file format.
3) Make the monochrome height image from the OBJ file of the glass using UTSUSHI.
4) Make the handkerchief using Height Cloth plug-in of TATARA.
5)Maximize, save and upload to the in-world.
You can check this tutorial by following video.
Let's make the glass hidden in the handkerchief.
The glass is turned upside down. Because you cannot see the inner side of the cup, you do not need to make it.
Boot TATARA and choose New on the File menu. 
On the New dialog, choose 32x32 of SPHERE and click the OK button. 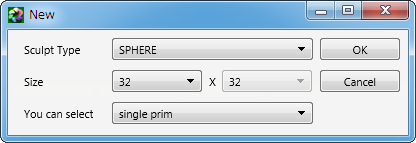
Click the ROKURO tab and change edit mode to ROKURO. 
As shown in the following figure, choose all the control points. 
As shown in the following figure, drag the upper right control point to the left, pressing the SHIFT key and the ctrl key. 
The edit pane is shown as shown in the following figure. 
Let's save the glass by the OBJ format.
Choose Save on the File menu. 
As shown in the following figure, choose OBJ File format and save it. 
And Close TATARA.
Let's make the monochrome height image from UTSUSHI from the OBJ file of the saved glass.
UTSUSHI is freeware of KANAE PROJECT.
You can download it from http://kanae.net/secondlife/utsushi.html. 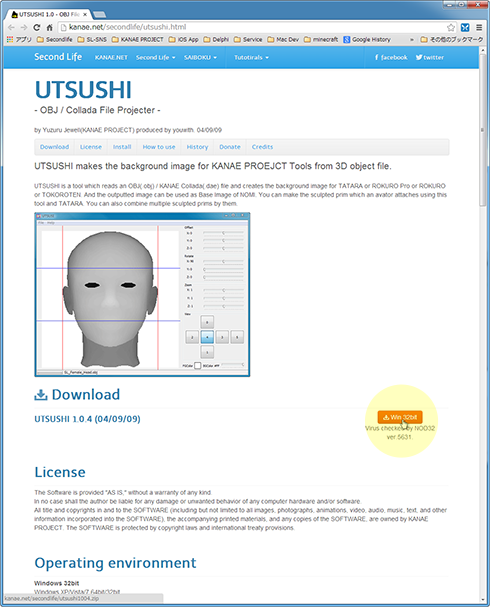
Let's download and Unzip UTSUSHI and do UTSUSHI. 
The window of the following figure is shown.
On the pane of left side, the height of the OBJ file or the Collada file is shown in monochrome image.
On the control panel pane of right side, the size of the object, the position, the direction of the camera, and the color of the height image which were loaded can be set. 
Let's set the direction of the camera in the same direction as the ROKURO mode of TATARA.
Click the 4 button of the View panel at the lower right of the UTSUSHI window. 
Let's load the object.
Choose Load Object on the File menu. 
Choose OBJ of the saved glass. Then, it is shown as shown in the following figure. 
Set up the Zoom panel, as shown in the following figure. 
Let's adjust the position so that the cup may touch the bottom of the preview, as shown in the following figure. 
As shown in the following figures, set up Z of the Offset panel. 
Let's change the direction of the camera into the direction which looked at the cup from the top.
Click the 0 button of the View panel. 
Let's adjust the color of monochrome image outputted.
Click FGColor at the lower right of the UTSUSHI window. 
As shown in the following figure, click the lower-left of the color selecting box. 
Set BGColor at the lower right of the UTSUSHI window as #00. 
Choose Save Image on the File menu. 
Choose and save Single Image (PNG) with the drops box of the file format. 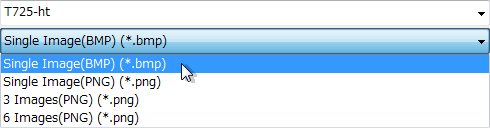
Then you get the following image. 
Let's make the handkerchief covered on the glass for height monochrome image created by UTSUSHI using Height Cloth plug-in of TATARA.
Boot TATARA. 
Let's edit the object using Height Cloth plug-in.
Let’s stop to rearrange the control points after the processing of plug-in.
As shown in the following figure, set Edit Level at the lower left of the edit pane as Near. 
Choose Height Cloth on the Tools menu. 
Height Cloth plug-in is the option. Please purchase the license code and place the plug-in file to the same folder as TATARA.
As shown in the following figure, Height Cloth Plug-in Dialog is shown. 
Set the parameter of the Height Cloth plug-in dialog. And click the Browse button, choose the PNG image created by UTUSHI and click the OK button. 
You can specify the following parameters.
-Height Data: You can select png, jpeg and bmp file.
Software changes the read picture into the gray scale of 256x256.
Black is low and white is high.
-Size: You can specify the aspect ratio of the sculpted prim from three types.
-Width: You can specify the width of cloth. I can check it on the Height Image.
-Height: You can specify the Height of cloth. I can check it on the Height Image.
-Offset:X: You can specify the position x of cloth. I can check it on the Height Image.
-Offset:Y: You can specify the position y of cloth. I can check it on the Height Image.
-Sticky: When the cloth is touched to height data, the cloth is locked.
-Method: You can specify the method of physics simulation.
-Viscosity: You can specify the viscosity rate of the cloth model.
-Spring: You can specify the spring rate of the cloth model.
-Damping: You can specify the damping rate of the cloth model.
-Loop Count: You can specify the count of computing of the simulation.
Height Cloth plug-in initializes disposition of the object by PLANE. So, it is not necessary to lock the control point. And when you redo edit, you do not have to do UNDO.
The preview pane is shown as shown in the following figure. 
The form of the handkerchief covered on the glass was completed.
Let's upload a sculpt-map file to the in-world.
Let's check Setup before saving.
Choose Setup on the File menu. 
Set TGA Save Size as 64x64 in the displayed dialog.
And let's check the following items.
-Copy Protection by transparent When the prim is modified, you can make it transparent to prevent the texture from being copied by screen capture.
-Auto Maximize The object saved when you save your sculpt map file is maximized automatically.
And click the OK button. 
If you check Auto Rename, overwrite of a sculpt-map file is prevented.
Let's save your sculpt map file in TGA File form.
Choose Save on the File menu. 
Choose TGA File of Save Dialog and save your file. 
Let's upload a sculpt-map file to the in-world.
When you upload a sculpt-map file, be sure to choose Upload Image.
It costs 10L$ to upload one Sculpt-Map file.
Choose Upload - Image (L$10) on the Build menu. 
Specify “Preview image as” as Sculpted Prim. And check it by the preview. Check Use lossless compression. And click Upload Button. 
Let's apply the sculpt map.
Build the objelct. And click the Object tab and set Building Block Type to Sculpted on Edit floater. And set Stitching type as Plane. 
Apply your uploaded sculpt map. 
Stretch your object suitably. 
Set the options of Texture, as shown in the following figures. 
The handkerchief covered on the glass was completed. 
Original text: http://kanaenet.blogspot.jp/2013/10/t725-1.html
This article is automatically translated by the computer interpreter.
Please notify me of any mistakes in translation.


