Let's make Kushi Dango using Objects of the Tools menu which is the new function of TATARA 7.0. 
Dango is a Japanese sweets made from rice flour. The Dango held by a skewer is called Kushi Dango.
If you want to know dango more, please check following wikipedia page.
http://en.wikipedia.org/wiki/Dango
I prepared the background image of the following sides of Kushi Dango. 
TATARA extends the background image automatically.
So, when you make the background image, please delete the margin.
Let's make Kushi Dango from the following steps.
1) Generate four spheres and one cylinder by Objects on the Tools menu.
2) Rearrange the objects generated by 1) step in TSUCHI mode.
3) Change the edit direction in TSUCHI mode and rearrange the object.
4) Choose Save on the Texture menu, save the grid texture, and make the texture of Kushi Dango.
5) Choose Load on the Texture menu and apply the texture of created Kushi Dango.
6) Choose Save on the File menu, and maximize and save it as sculpt map file.
You can check this tutorial by following video.
Let's make Kushi Dango.
Choose Objects on the Tools menu. 
Plug-in is displayed under Objects.
Set Size as 16x64 on the Objects dialog. 
Sculpt Type is automatically set as PLANE.
Set Detail as 2. 
Detail is the resolution of the object generated. If it is large, the object will be generated using many control points. When the object is not settled in the width of the sculpt map, TATARA adjusts it automatically.
Click + button on the Objetcts button. 
The Box object which is the default is added.
Change Type of the Object group into Sphere. 
The number for getting to know the number of objects generable at the upper right of the Object dialog is displayed. You can check that Sphere with Detail:2 consumes “64-55=9” counts. The object will not be generated if this number overflows.
Click + button on the Objetcts button 4 times. 
Four objects of the same Type as the object chosen now are generated.
Choose bottom Sphere and change Type of the Object group into Cylinder. 
The numerical value at the upper right of the Object dialog is displayed as 17/64. It turns out that 17 points remain.
Click the OK button. 
Then, the edit pane is displayed as follows. 
So, if you choose one control point of the object, all the control points which constitute the object automatically are chosen.
Let's rearrange five objects generated by Objects on the Tools menu in TSUCHI mode.
Because the default edit mode of TATARA is TSUCHI, you do not need to change edit mode.
Let's assign the background image.
Assign Load Background on the View menu and read the prepared background image. 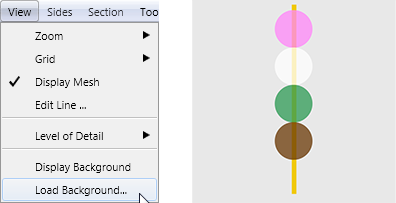
Then, the edit pane is displayed as follows. 
Choose the object of the red area of the following figure. Because it is registered as one group, if you click one control point of the object, all the control points will be chosen automatically. 
Drag the selected area, as shown in the following figure, and arrange the control points at the center of the pink circle. You can also use the arrow key to do this. 
As shown in the following figure, pressing the CTRL key, drag the upper right control point and expand the object to overlap with the pink circle exactly. 
Choose the object of the red area of the following figure. Because it is registered as one group, if you click one control point of the object, all the control points will be chosen automatically. 
Drag the selected area, as shown in the following figure, and arrange the control points at the center of the white circle. You can also use the arrow key to do this. 
As shown in the following figure, pressing the CTRL key, drag the upper right control point and expand the object to overlap with the white circle exactly. 
Choose the object of the red area of the following figure. Because it is registered as one group, if you click one control point of the object, all the control points will be chosen automatically. 
Drag the selected area, as shown in the following figure, and arrange the control points at the center of the green circle. You can also use the arrow key to do this. 
As shown in the following figure, pressing the CTRL key, drag the upper right control point and expand the object to overlap with the green circle exactly. 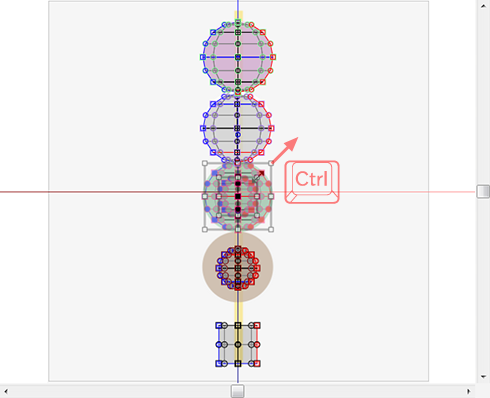
Choose the object of the red area of the following figure. Because it is registered as one group, if you click one control point of the object, all the control points will be chosen automatically. 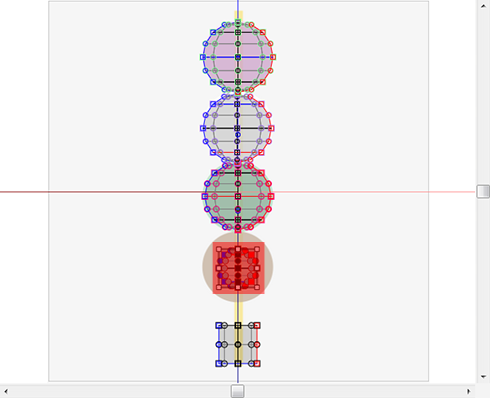
Drag the selected area, as shown in the following figure, and arrange the control points at the center of the brown circle. You can also use the arrow key to do this. 
As shown in the following figure, pressing the CTRL key, drag the upper right control point and expand the object to overlap with the brown circle exactly. 
Choose the object of the red area of the following figure. Because it is registered as one group, if you click one control point of the object, all the control points will be chosen automatically. 
As shown in the following figure, drag the control point of the right center and unite the cylinder with the thickness of the yellow square of the background image. 
As shown in the following figure, drag the control point of the upper center, lengthen the cylinder up, and make the yellow square of the background image fit. 
The preview is displayed as follows. 
Only the form from one way is edited in TSUCHI.
Let's edit from another direction in TSUCHI mode.
As shown in the following figure, click the YZ button of the central lower part of the edit pane. 
Let's use the same background image also in this direction.
Choose Load BackGround on the View menu and read the prepared background image. 
Click the control point which constitutes the bottom of the cylinder type as shown in the following figure. Then, the control points of the same group are chosen automatically. 
As shown in the following figure, drag the control point of the center of right-hand side, pressing the Ctrl key, and make the yellow square of the background image fit. 
As shown in the following figure, click the control point of red area. Then, the control point of the same group is chosen automatically. 
As shown in the following figure, click the control points of red area pressing the SHIFT key. Then, the control points of the respectively same group are chosen automatically. 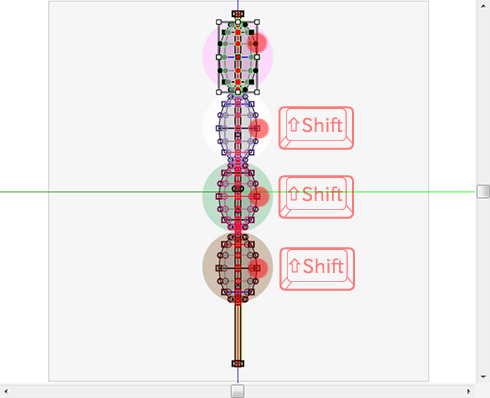
As shown in the following figure, all the Dangos are chosen. 
As shown in the following figure, drag the control point of the center of right-hand side, pressing the Ctrl key. 
The form of Kushi Dango was made.
Let's make the texture of Kushi Dango.
Let's use the texture of the grid currently displayed by the preview.
Choose Save on the Texture menu (On the far left of the menu bar.), and save the mesh texture. 
You can get the texture corresponding to its aspect rate.
Check the number of the preview and create the following texture by your paint tool. 
The relation of the number of the created texture and the grid becomes as it is shown in the following figure. 
Choose Load on the Texture menu and read into the preview the texture created with the paint tool. 
The preview pane is displayed as follows. 
If you uncheck Disp Mesh on the View menu, you can see the preview without grids. 

Let's check Setup before saving.
Choose Setup of the File menu. 
Set TGA Save Size as 64x64 in the Setup dialog.
And let's check the following list items.
-Copy Protection by transparent :When the Prim is modified, you can make it transparent to prevent the texture from being copied by screen capture.
- Auto MaximizeTGA File format :You can maximize the sculpt-map file automatically and save it. 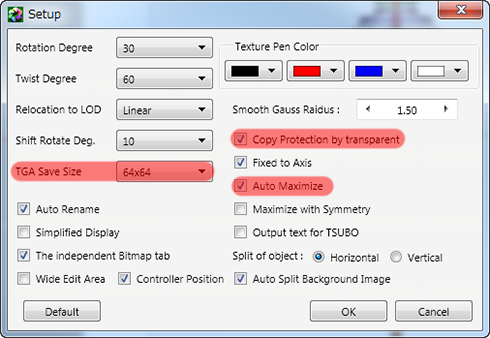
Let's save the sculpt-map file.
Choose Save on the File menu. 
Choose TGA File of SaveDialog and save the file. 
Let's upload the sculpt-map file to the in-world.
When you upload the sculpt-map file, be sure to choose Upload Image on the File menu.
It costs 10L$ to upload one Sculpt-Map file. 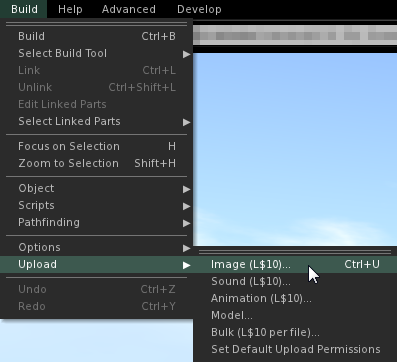
First, upload the texture. 
Next, upload the sculpt-map file.
Check by preview. And check Use lossless compression. 
Let's apply the texture and the sculpt map to prim.
Set Building Block Type to Sculpted. 
(Cylinder may be sufficient as Stiting type this time..
Apply the sculpt-map file to the object. 
Apply the texture to the object. 
Adjust size, as shown in the following figure. 
Kushi Dango was completed. 
Original text: http://kanaenet.blogspot.jp/2013/06/t702-1.html.
This article is automatically translated by the computer interpreter.
Please notify me of any mistakes in translation.


