9/28/2009

TUTORIAL T08 Make a Base of Clothes

Let's make the base of clothes as shown in the following figure.

To make this, I prepared the two following background images.
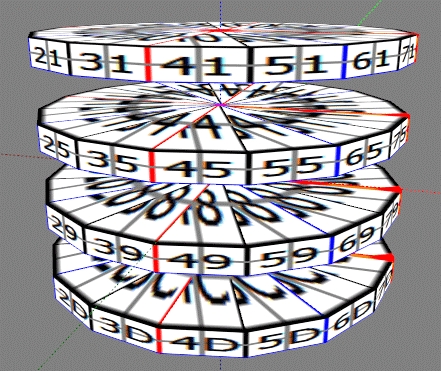
This is the image seen from the front used in ROKURO mode.

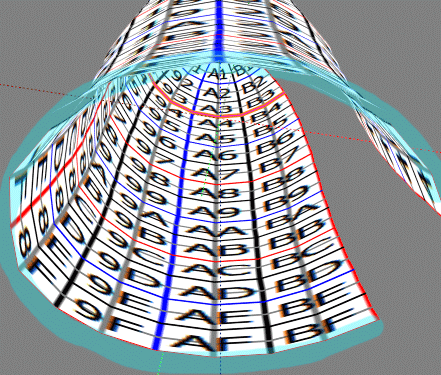
This is the image seen from the upper part used in TOKOROTEN mode. Note that the front has turned to the right.

When you make a symmetrical thing in TOKOROTEN mode, Mirror 80-GG from 00-7G is used. As for the function, a lower half is copied to an upper half. It is Tips when making a symmetrical thing.

I extracted the place required at ObjCut to make dress from the OBJ file of an avatar, in order to make this image, I cut down the screen needed by UTSUSHI of freeware, and applied the part which becomes a part of dress with a paint tool.
Let's make the base of clothes from the following steps using these two images.
1) Select Cylinder.
2) Make the form seen from the front in ROKURO mode.
3) Make the form (lower half) seen from the top in TOKOROTEN mode.
4) Select the bottom section and keep an inner side from the ability to be seen.
5) Influence symmetrically in TOKOROTEN mode.
Let's make the base of clothes.
Boot TATARA and select New-Cylinder-32x32 on the File menu.

Check that it is in ROKURO mode and read a background image.
Select Load Background on the View menu.

You can specify the image of a background for every mode.
Let's make the form roughly. Select Far by Level of Detail on the View menu.

Move square control points.

Then, circular control points where are surrounded by the light-blue line is rearranged automatically.
Even if you move the circular control point which is not a key, other control points are not rearranged.
Arrange control points in the following Image.
 
Select Near by Level of Detail on the View menu.

Adjust circular control points as follows.

A preview pane is displayed as follows.

Thus, if you move the control point which changes Level of Detail and serves as a key and make a rough form, you can shorten the time of edit.
Let's make the form seen from the top.
Select a TOKOROTEN tab and change edit mode.
Select Load Background on the View menu and read the prepared background image.
 
Let's edit a right half as follows. The left half is automatically arranged by the mirror function.

Each move two control points as follows.

Select the control point of the following ranges.

Right-click an edit pane and select Equal Intervals on a pop up menu.

The shortcut key is CTRL+D.
Then, align as follows. (This is temporary arrangement)

Select the control point of the following ranges.

Right-click an edit display and select Equal Curves on a pop up menu.

Then, control points at the circle are arranged as follows at the circle centering on the starting point.

But this function is inapplicable to inside control points.
Please move one inner side at a time as follows manually.

The right half was made now.

A preview is displayed as follows.

It is better to bring control points close, because the following parts are sharp.

Do the upper work again and arrange control points.
Select Mirror 80-GG from 00-7G on the Edit menu, and carry out the mirror of the right half to a left half.

You look at a preview and you know using as a mirror the face made by the red line and the blue line.

So, click the button of ZX instead of YZ.

The form was made as shown in the following figures.

If you preview the part of the bottom of a part, you will find the following crevices.

Let's close this crevice.
Select Select None on the Sides menu in TOKOROTEN mode, and edit only the control point currently displayed on the present edit display.

Let's move to the bottom section.
Please click a "<" button until the display of the button of the center at the lower left of an edit display will be G0.

As shown in the following figures, stick inside control points to outside control points.

You can check as follows that the crevice between the lower parts of a part has closed.


Choose Setup on the File menu.
Set TGA Save Size to 64x64.
Check Copy Protection by transparent.
Check by the coordinate system of Second Life.
And click the OK button.


Choose Save on the File menu.


Let's upload a sculpt-map file to the in-world.
When you upload a sculpt-map file, be sure to choose Upload Image on the File menu.
It costs 10L$ to upload one Sculpt-Map file.

And check by preview and check Use lossless compression.

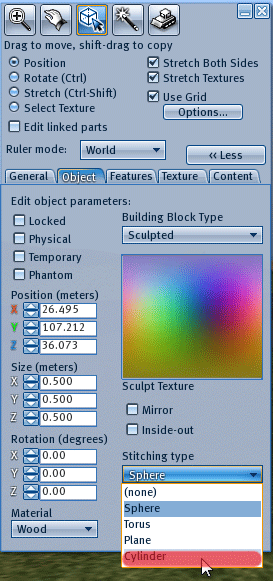
Apply a sculpt map prim with the object tab of edit, and specify a cylinder as the stitching type.

Please equip yourself and adjust a position and size. The base of clothes is completed.

This is a basic form. You should transform it into the form fit for the body of the avatar in TSUCHI mode.
Original text: http://kanaenet.blogspot.com/2009/04/blog-post_2755.html
This article is automatically translated by the computer interpreter.
Please notify me of any mistakes in translation.

TUTORIAL T09 Make four Leaves

Let's make the four following leaves only from 1 Prim.

As a background image of a leaf, I prepared the following photographs.

* Though the edge of a leaf has a notch, please allow it to become smooth.

Let's create the form and texture of four leaves at the following steps using the upper image.
1) Make the rough form of four sheets in ROKURO mode.
2) Shift the connection position of four leaves in MAGE mode.
3) Make a form with a rough leaf in WAPPA mode.
4) Make connection in MAGE mode.
5) Adjust the form of a leaf in TSUCHI mode.
6) Once save it.
7) Make a texture from SOMATO using the Sculpt-Map file and background image which were saved.
8) Read into TATARA the texture made from SOMATO.

Select New-Sphere-32x32 on the File menu. It is a default.

To make a rough form, specify Grid and Level of Detail.
Specify 8 by Grid on the View menu.

And specify Middle by Level of Detail on the View menu.

Thereby, circular control points are rearranged automatically.

Select the control points surrounded in the red of the following images.

Arrange these in at equal intervals. Right-click an edit pane and select Equal Intervals on the pop up menu. The keyboard shortcut is Ctrl+D.

Then, it becomes as it is shown in the following figures.

By the upper image, move the control points specified in red and arrange as follows.

And as shown in the following figures, expand horizontally.

Then, the disk of four sheets was made.

Let's edit these disks of four sheets and make it four leaves.

The joints of four leaves are in the center of a leaf.
Shift the position of joints, to make them not conspicuous.
In order to check the position of a leaf, load a background image by Load Background on the View menu.

Select a MAGE tab, select the control points surrounded in red, and move them.

Arrange them like the following image.

Select a WAPPA tab, click the ">" button and make it "50" as which the biggest section of the leaf is displayed.

Load a background image by Load Background on the View menu.

Select 1 by Grid on the View menu.

Move control points like the arrows of the red of the following image. Because you cannot make the notch of the edge of a leaf, please arrange a control point inside a little from a background image.

The circular control points are rearranged automatically.

If you select a MAGE tab, it turns out that the joints are thick. It is because these were rearranged when you edited it with a WAPPA tab. Select the control points specified in red and move them.

Please rearrange them as follows.

Select Near by Level of Detail on the View menu for finer edit.

Select a TSUCHI tab and click the XY button at the lower right of an edit pane.

Move the circular control points of the edge of leaves. Because 12 control points have overlapped, please be sure to select these control points by range specification.

Please rearrange as follows.

The form of four piled-up leaves was made.

Select Save on the File menu and once save this. But because it uses after creating a texture by SOMATO, please do not end TATARA.

Boot SOMATO, select Load Sculpt/OBJ on the File menu and read the saved Sculpt-Map file.

Select Load on the Source menu and read a background image.

Use the same arrangement as the time of clicking "1" button and clicking the XY button in TSUCHI mode of TATARA.

If you use TATARA and SOMATO, it is not necessary to carry out position adjustment of a texture. This is a merit using these.

Because four leaves have overlapped, make a texture collectively.
Select X-ray of Bake Type and click the Bake button.

The texture of the leaf was made as follows.

Select Save on the Texture menu and save the completed texture.

Thus, you can do simply making a form and a texture from one background image. After making a texture, even if you change the thickness of a leaf or it rearranges the position of a leaf, a texture does not shift.

When you want to specify another texture as the back side of a leaf, make the texture of the same form from the same size as the front side, do the same work by SOMATO, and set two textures to one.

Read the texture which selected Load on the Texture menu and was made from SOMATO to TATARA.

Select the MAGE tab and select the leaf of the top surrounded in red as shown in the following figure.
T09-45

Right-click an edit pane and select Horizontal Align on a pop up menu.

Though the top leaf becomes thin as follows, a texture does not shift.
 

Make the three remaining leaves thin similarly.

Click the XY button which selects a TSUCHI tab and is in the lower right of an edit pane.

By shortcut CTRL+A, select all the control points, as shown in the following figure, drag the control points at the upper right of the edit range, and make it small.

Make width of that into the size below half of an edit display for it with the aspect ratio of a background image.

Remove the check of Disp Background on the View menu, and carry out a background image to un-displaying.

As shown in the following figure, move all leaves in the center of right side.

Click the XZ button at the lower left of an edit pane, and it was surrounded in red and also select the second leaf from from.

Click the XY button in the lower right of an edit pane, and rotate the control point selected as shown in the following figure.

Rotate the 3rd and the 4th leaf as follows from a top similarly.

A preview is as follows.

Furthermore, if you combine the copy & paste function of TSUCHI and Bitmap, you can add roundness to a leaf like a board, or can change direction into it.

Finally, select Maximize on the Edit menu and use the prim maximum size.

And size of a TGA file is set to 64x64 by Setup on the File menu, and Copyprotect by transparent is checked.   Select Save on the File menu and save a Sculpt-Map file.

Let's upload the sculpt-map file and texture to the in-world.

When you upload a sculpt-map file, be sure to choose Upload Image on the File menu. It costs 10L$ to upload one Sculpt-Map file.

Upload the sculpt-map file. And check by preview and check Use lossless compression.

Upload the texture.

Apply the sculpt-map and texture to an object.

Four leaves are completed.

Original text: http://kanaenet.blogspot.com/2009/04/4_6319.html

This article is automatically translated by the computer interpreter.

Please notify me of any mistakes in translation.